When we first introduced Blue Images to Marlin Oyster, we set out to address deployment complexity in trusted execution environments: how do you make enclave deployment both secure and practical? The answer was to separate the trusted platform from the dynamic workload, a concept that has since transformed how developers interact with confidential computing.
But like any ambitious technical solution, Blue Images needed refinement. The initial implementation, while novel, revealed friction points that only became apparent when developers started using it in production. Today, we’re sharing how we’ve streamlined the deployment experience while maintaining the security guarantees that make Blue Images powerful.
Both the UI and CLI provide access to the same Blue Image primitives, giving you flexibility in how you interact with Oyster. The CLI excels at automation, scripting, and CI/CD pipelines, offering fine-grained control and programmatic workflows. The UI complements this by providing a guided, visual experience that’s ideal for exploration, iteration, and onboarding new team members.
Understanding Blue Images in Oyster
Blue Images change the architecture of enclave deployment. Instead of baking applications directly into enclave images, which led to non-deterministic builds and verification complexity, Blue Images provide a fixed, reproducible platform that remains stable across deployments.
If you want a deep dive into the architecture and trust model behind Blue Images, the following article “Understanding Blue Images in Marlin Oyster” is a great place to start. It walks through how Blue Images separate platform identity from workload execution, how PCRs are used, and how the Image ID is derived from platform and workload measurements.
The core innovation lies in the separation of concerns:
- Platform Identity (PCR0-PCR2): These hardware-enforced measurements capture the fixed Blue Image platform, the kernel, init process, and root filesystem. These values are deterministic and don’t change regardless of what workload you deploy.
- Workload Commitment (PCR16): When you submit a job, your Docker Compose configuration and init parameters are packaged, encrypted if needed, and their digest is extended into PCR16. This creates a cryptographic commitment to your specific workload.
- Image ID: A single identifier computed as Hash(PCR0, PCR1, PCR2, PCR16) that collapses complex measurements into a verifiable fingerprint. This is what you check to ensure your enclave is running the correct Blue Image with your intended workload.
This architecture means you can deploy thousands of different applications on a single, audited platform without rebuilding enclave images or manually tracking shifting PCR measurements.
The Early Days: Learning from Developer Feedback
When Blue Images first launched, developers could use CLI tools to construct init parameters, compute Image IDs, and manage the entire attestation flow. This approach provided excellent control and scriptability, making it ideal for automation and CI/CD pipelines. However, as more teams adopted Blue Images, we identified opportunities to make deployment more accessible:
Opportunities for Better Onboarding: New users found it challenging to understand the relationship between Docker Compose files, init parameters, and Image IDs. Teams new to TEEs would benefit from a more guided introduction to these concepts.
Streamlining Image ID Computation: While CLI tools handled Image ID computation effectively, there was an opportunity to make this step more seamless for users who preferred visual interfaces.
Init Parameter Management: Handling multiple files and text entries required careful formatting. There was an opportunity to provide better validation and error messages to catch formatting issues earlier.
Enhanced Validation: Adding validation for Docker Compose files before deployment would help catch runtime errors earlier in the process.
Workflow Integration: For teams that preferred visual workflows, there was an opportunity to provide a more integrated experience that reduced context-switching between different tools.
The feedback was clear. Developers wanted the security and flexibility of Blue Images, and they appreciated the CLI’s power for automation. They also wanted additional deployment options that could complement the CLI particularly for exploration, iteration, and onboarding scenarios. The CLI remains the go-to choice for automation, scripting, and CI/CD, while the UI provides a complementary option for those who prefer a guided, visual workflow.
The Latest Update: A Streamlined Deployment Experience
Our latest update to Oyster introduces a new UI deployment interface that complements the existing CLI tools. This provides developers with more flexibility in how they interact with Blue Images, while both approaches use the same underlying primitives and maintain the same security guarantees.
Note for CLI Users: The CLI remains fully supported and continues to be the preferred tool for automation, scripting, and CI/CD pipelines. The new UI is designed to complement CLI workflows, not replace them. Advanced users can continue using CLI tools for fine-grained control, programmatic deployments, and integration into existing infrastructure-as-code workflows.
Deployment via UI
The UI provides a guided, visual deployment experience. Here’s how the workflow looks:
- Image configuration
- Choose instance type, region, architecture, duration, and bandwidth.
- Toggle advanced mode if you want to supply a custom EIF.

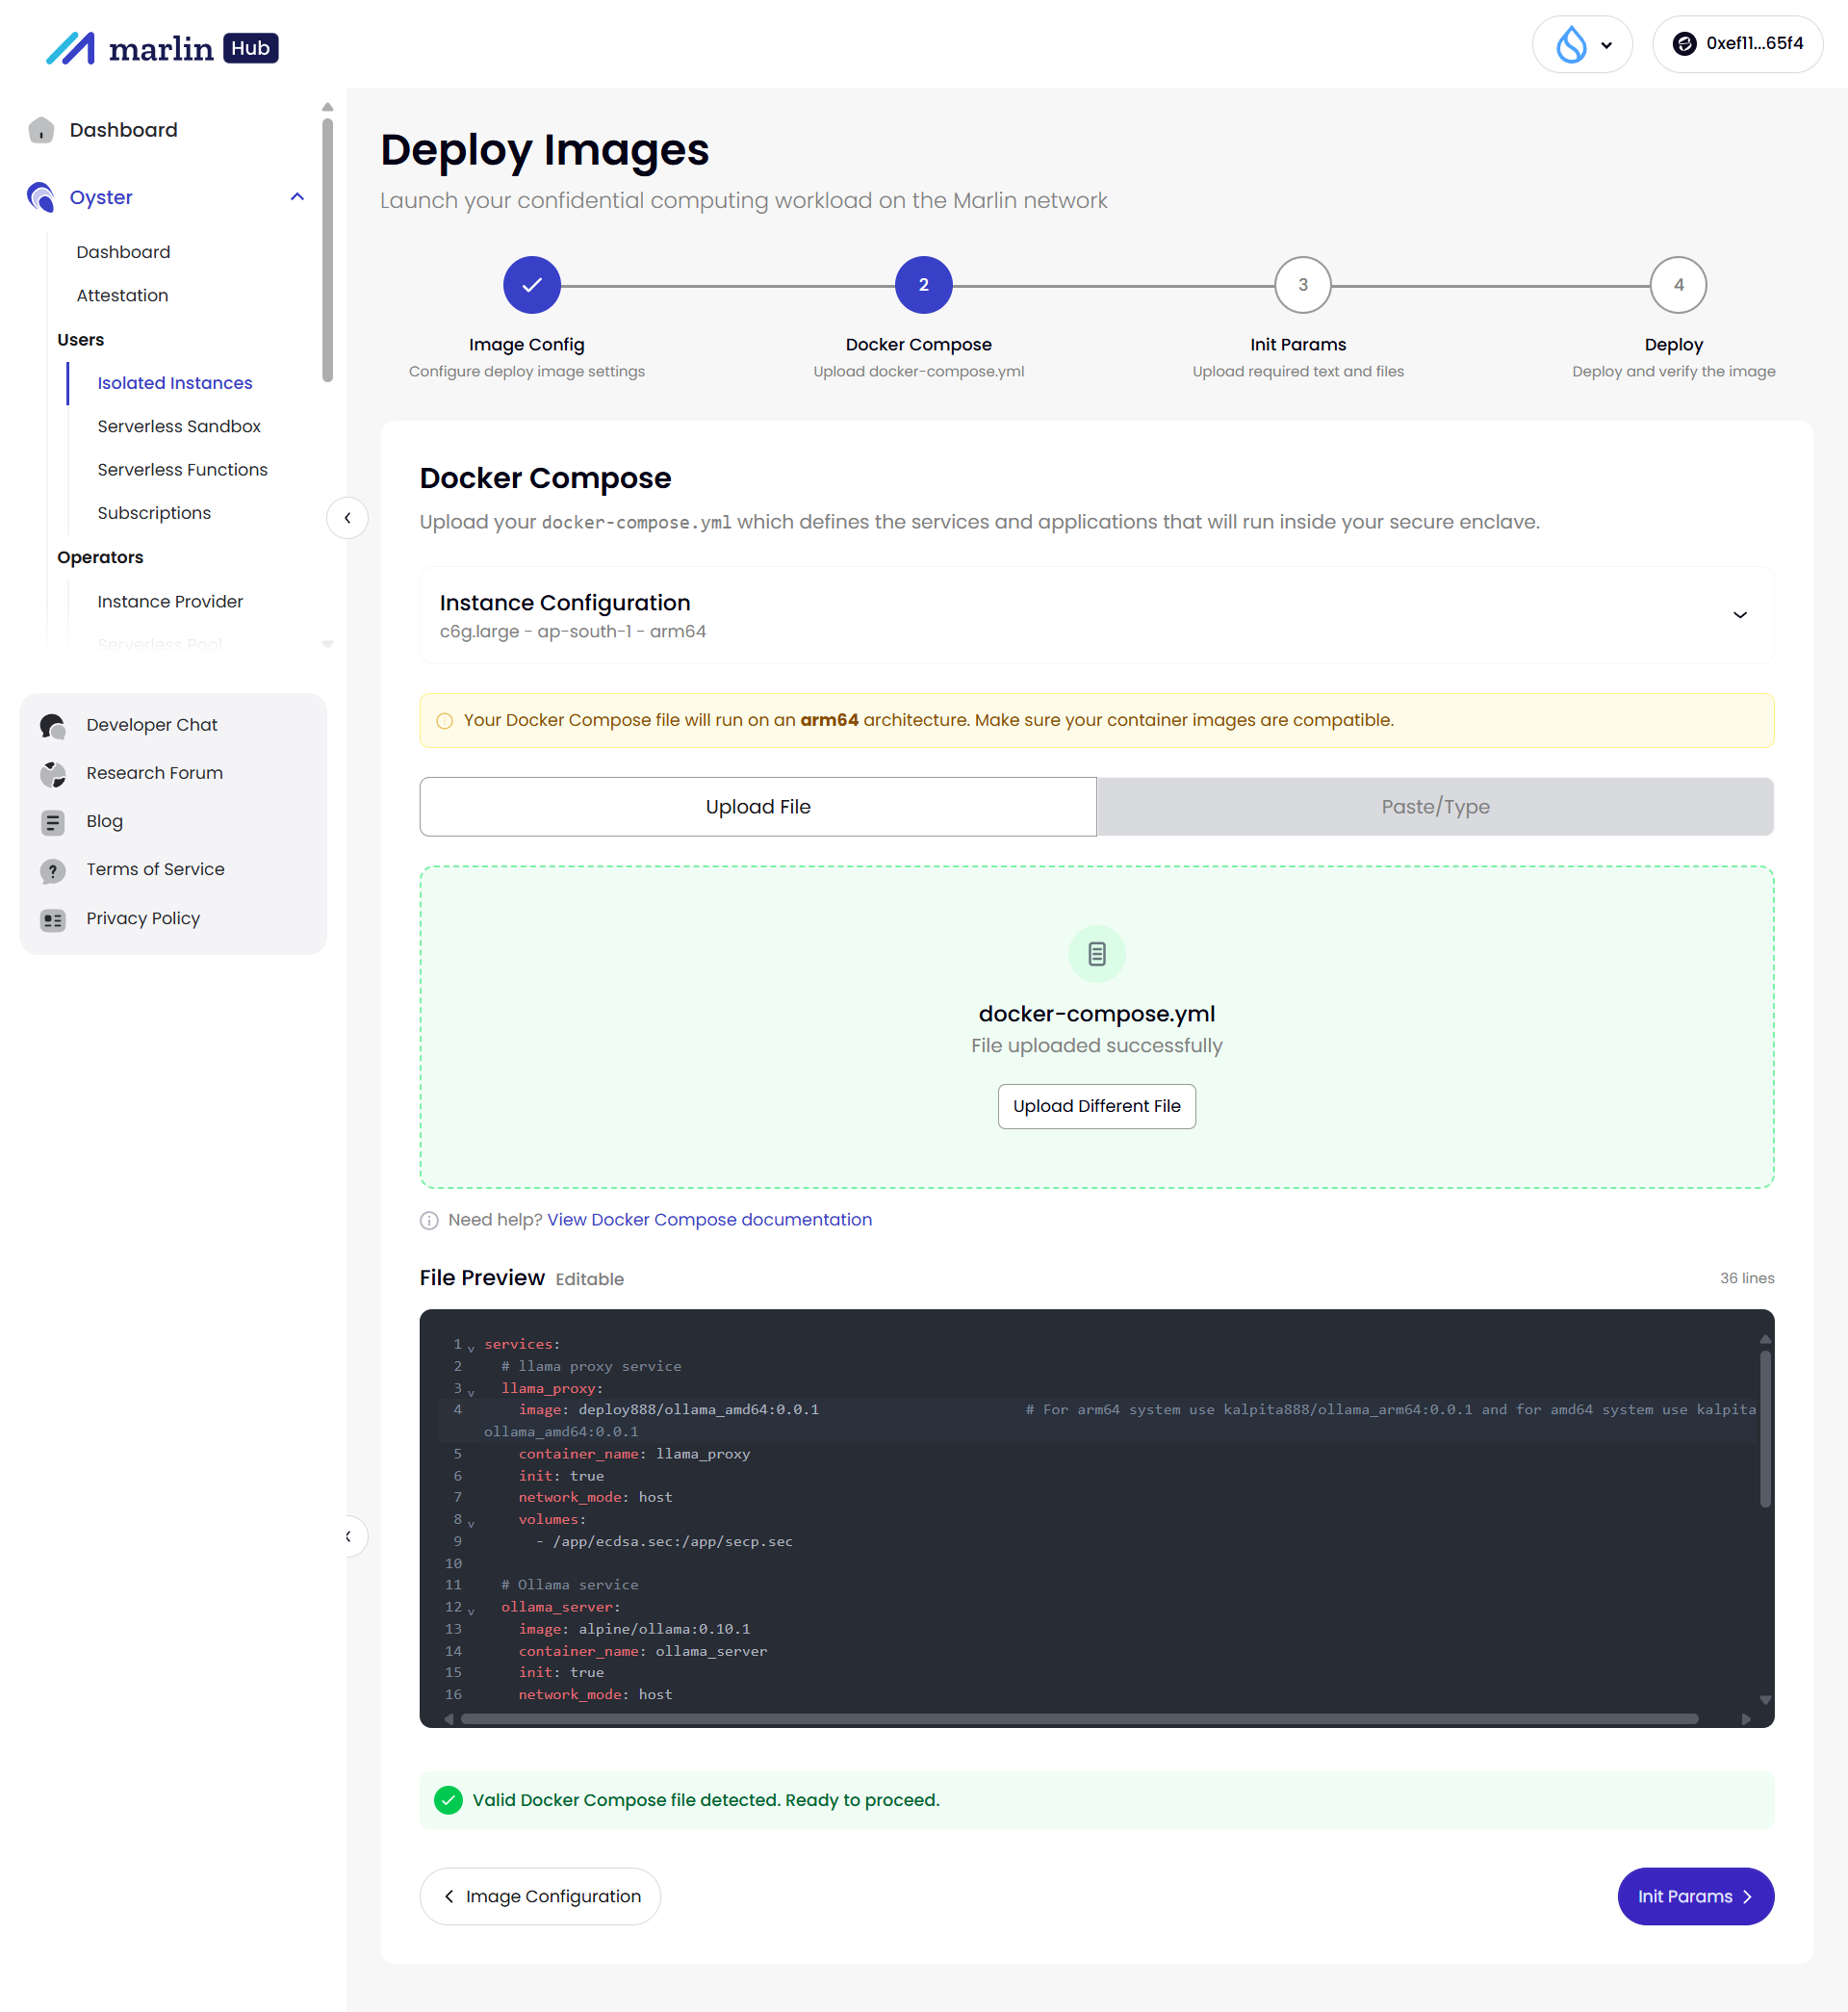
- Docker Compose (or paste)
- Upload a docker-compose.yml, paste YAML, or pick a template.
- Real-time validation catches syntax issues; architecture tips remind you about amd64 vs arm64 images.
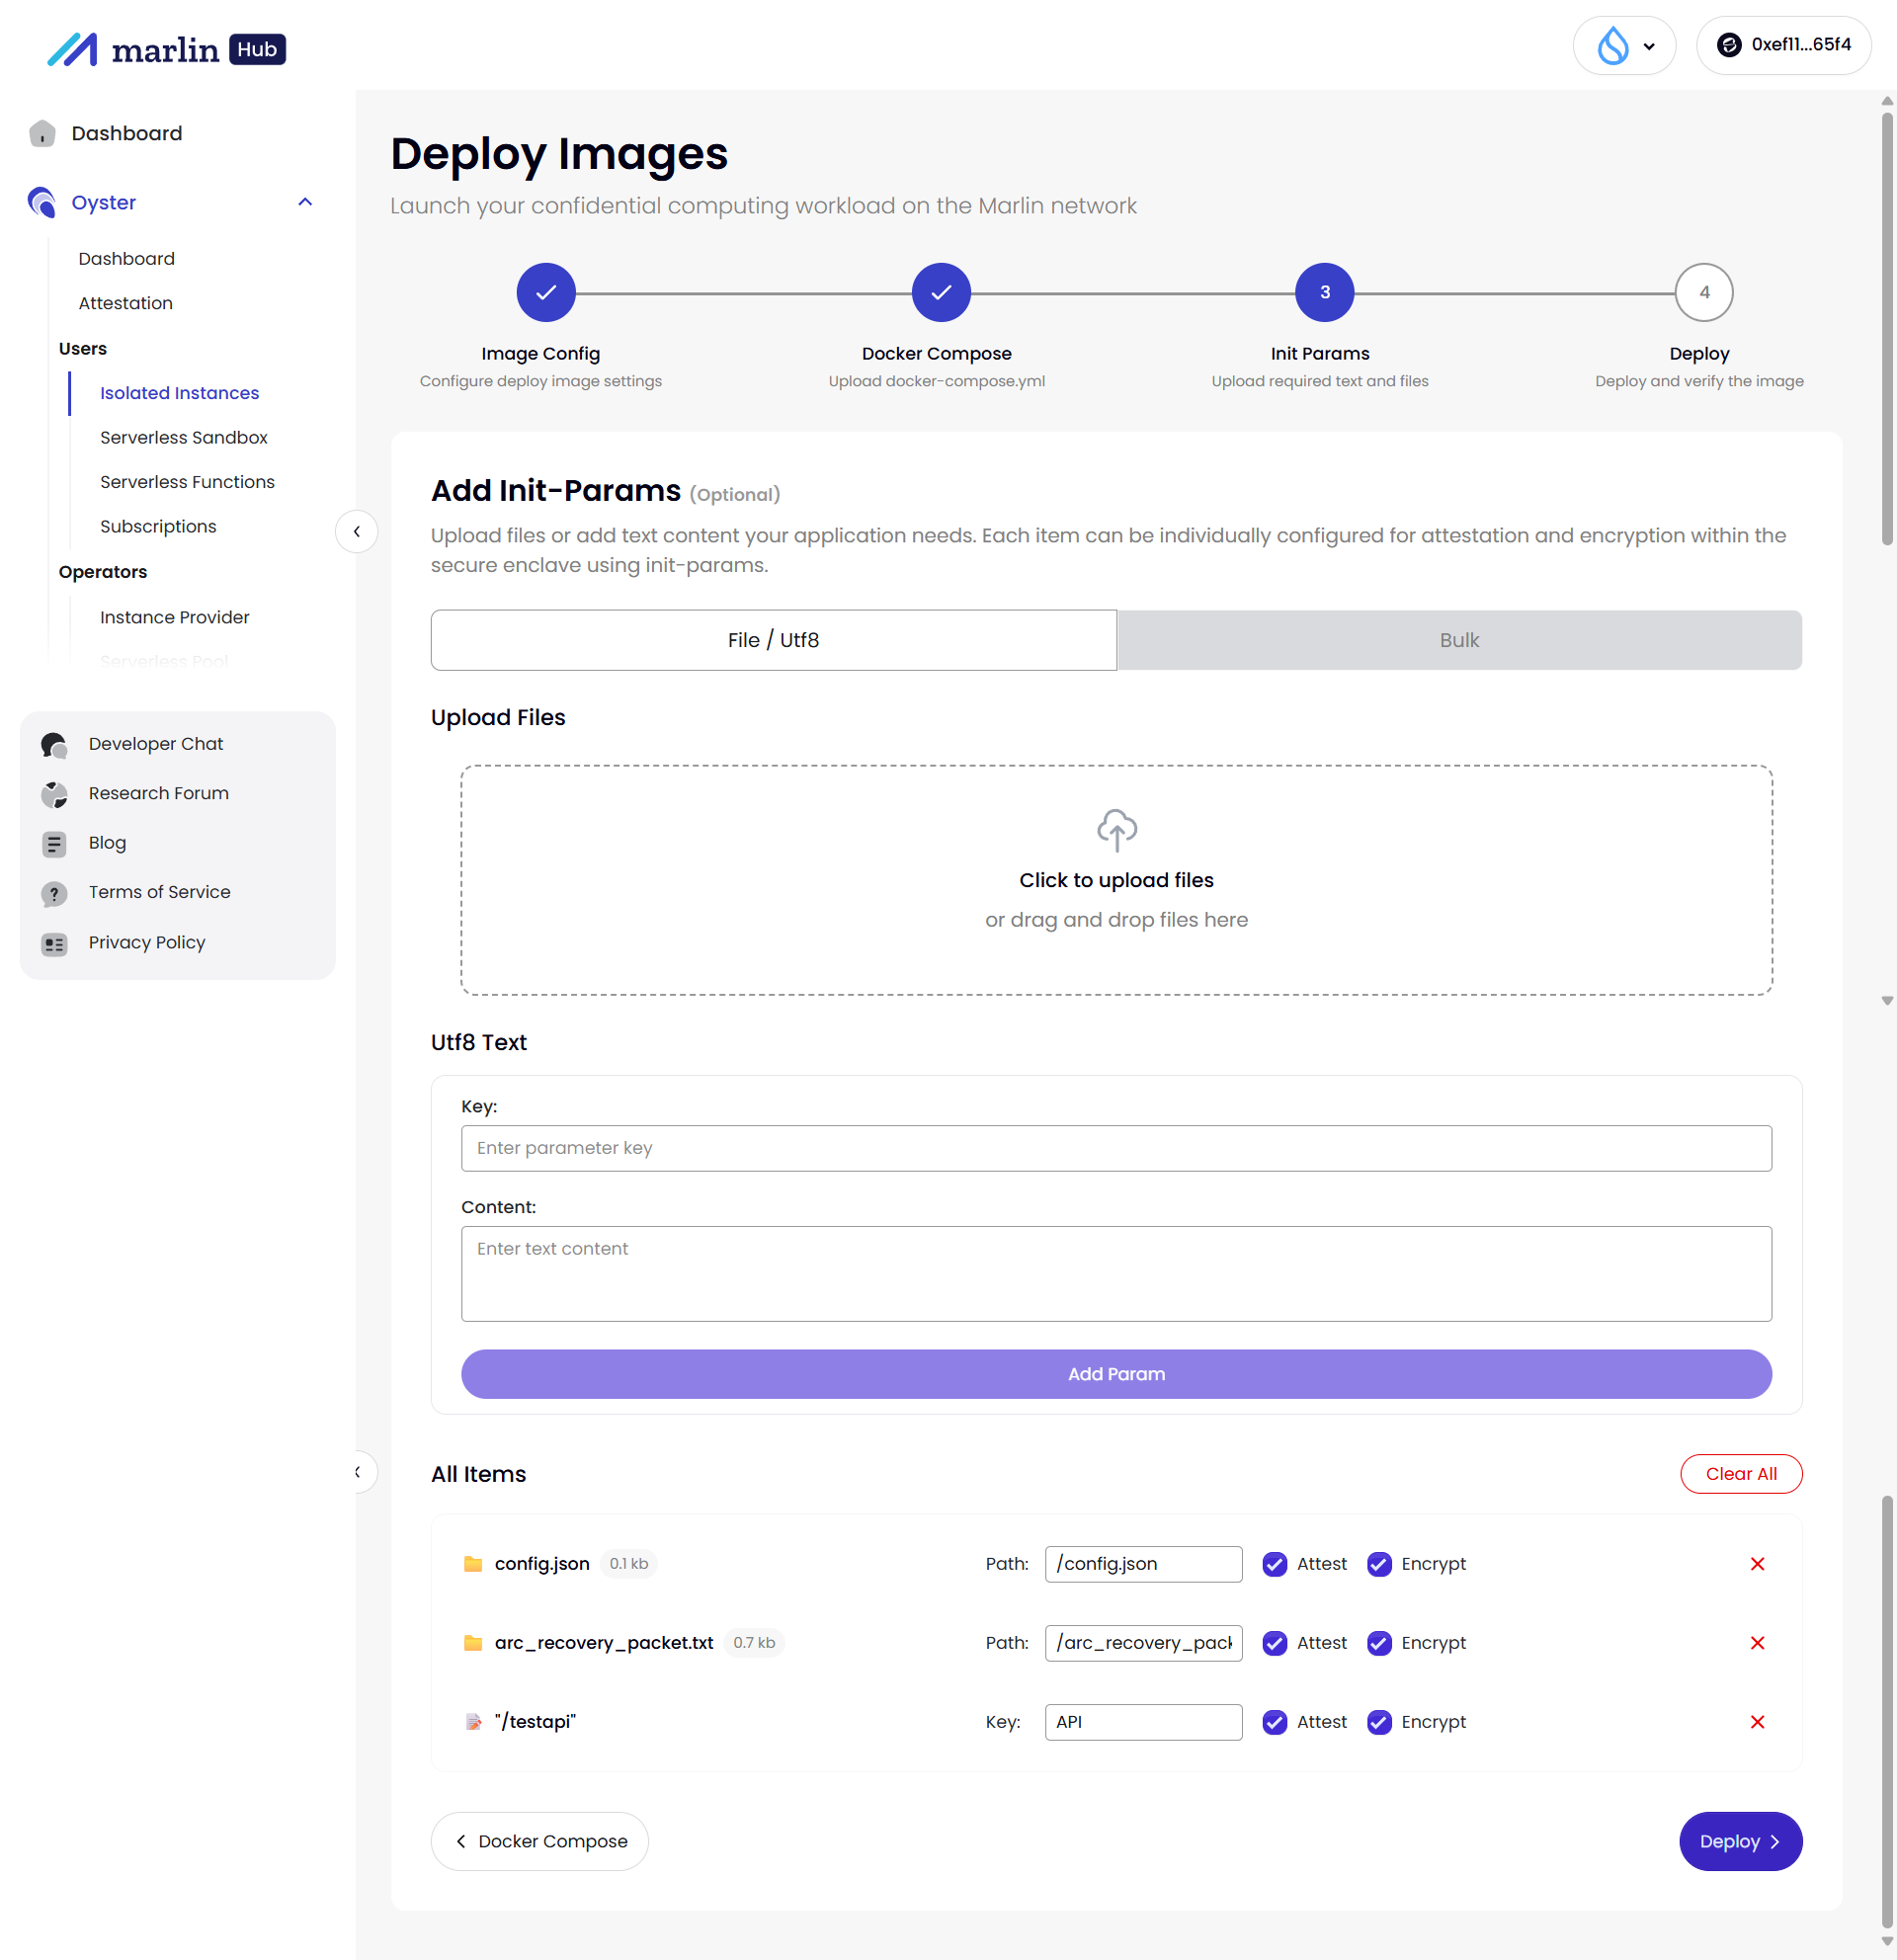
- Init params
- Drag-and-drop files, add text, or paste bulk params (
<path>:<attest>:<encrypt>:<type>:<value>). - Per-item toggles for attestation/encryption; placeholders highlight missing files.
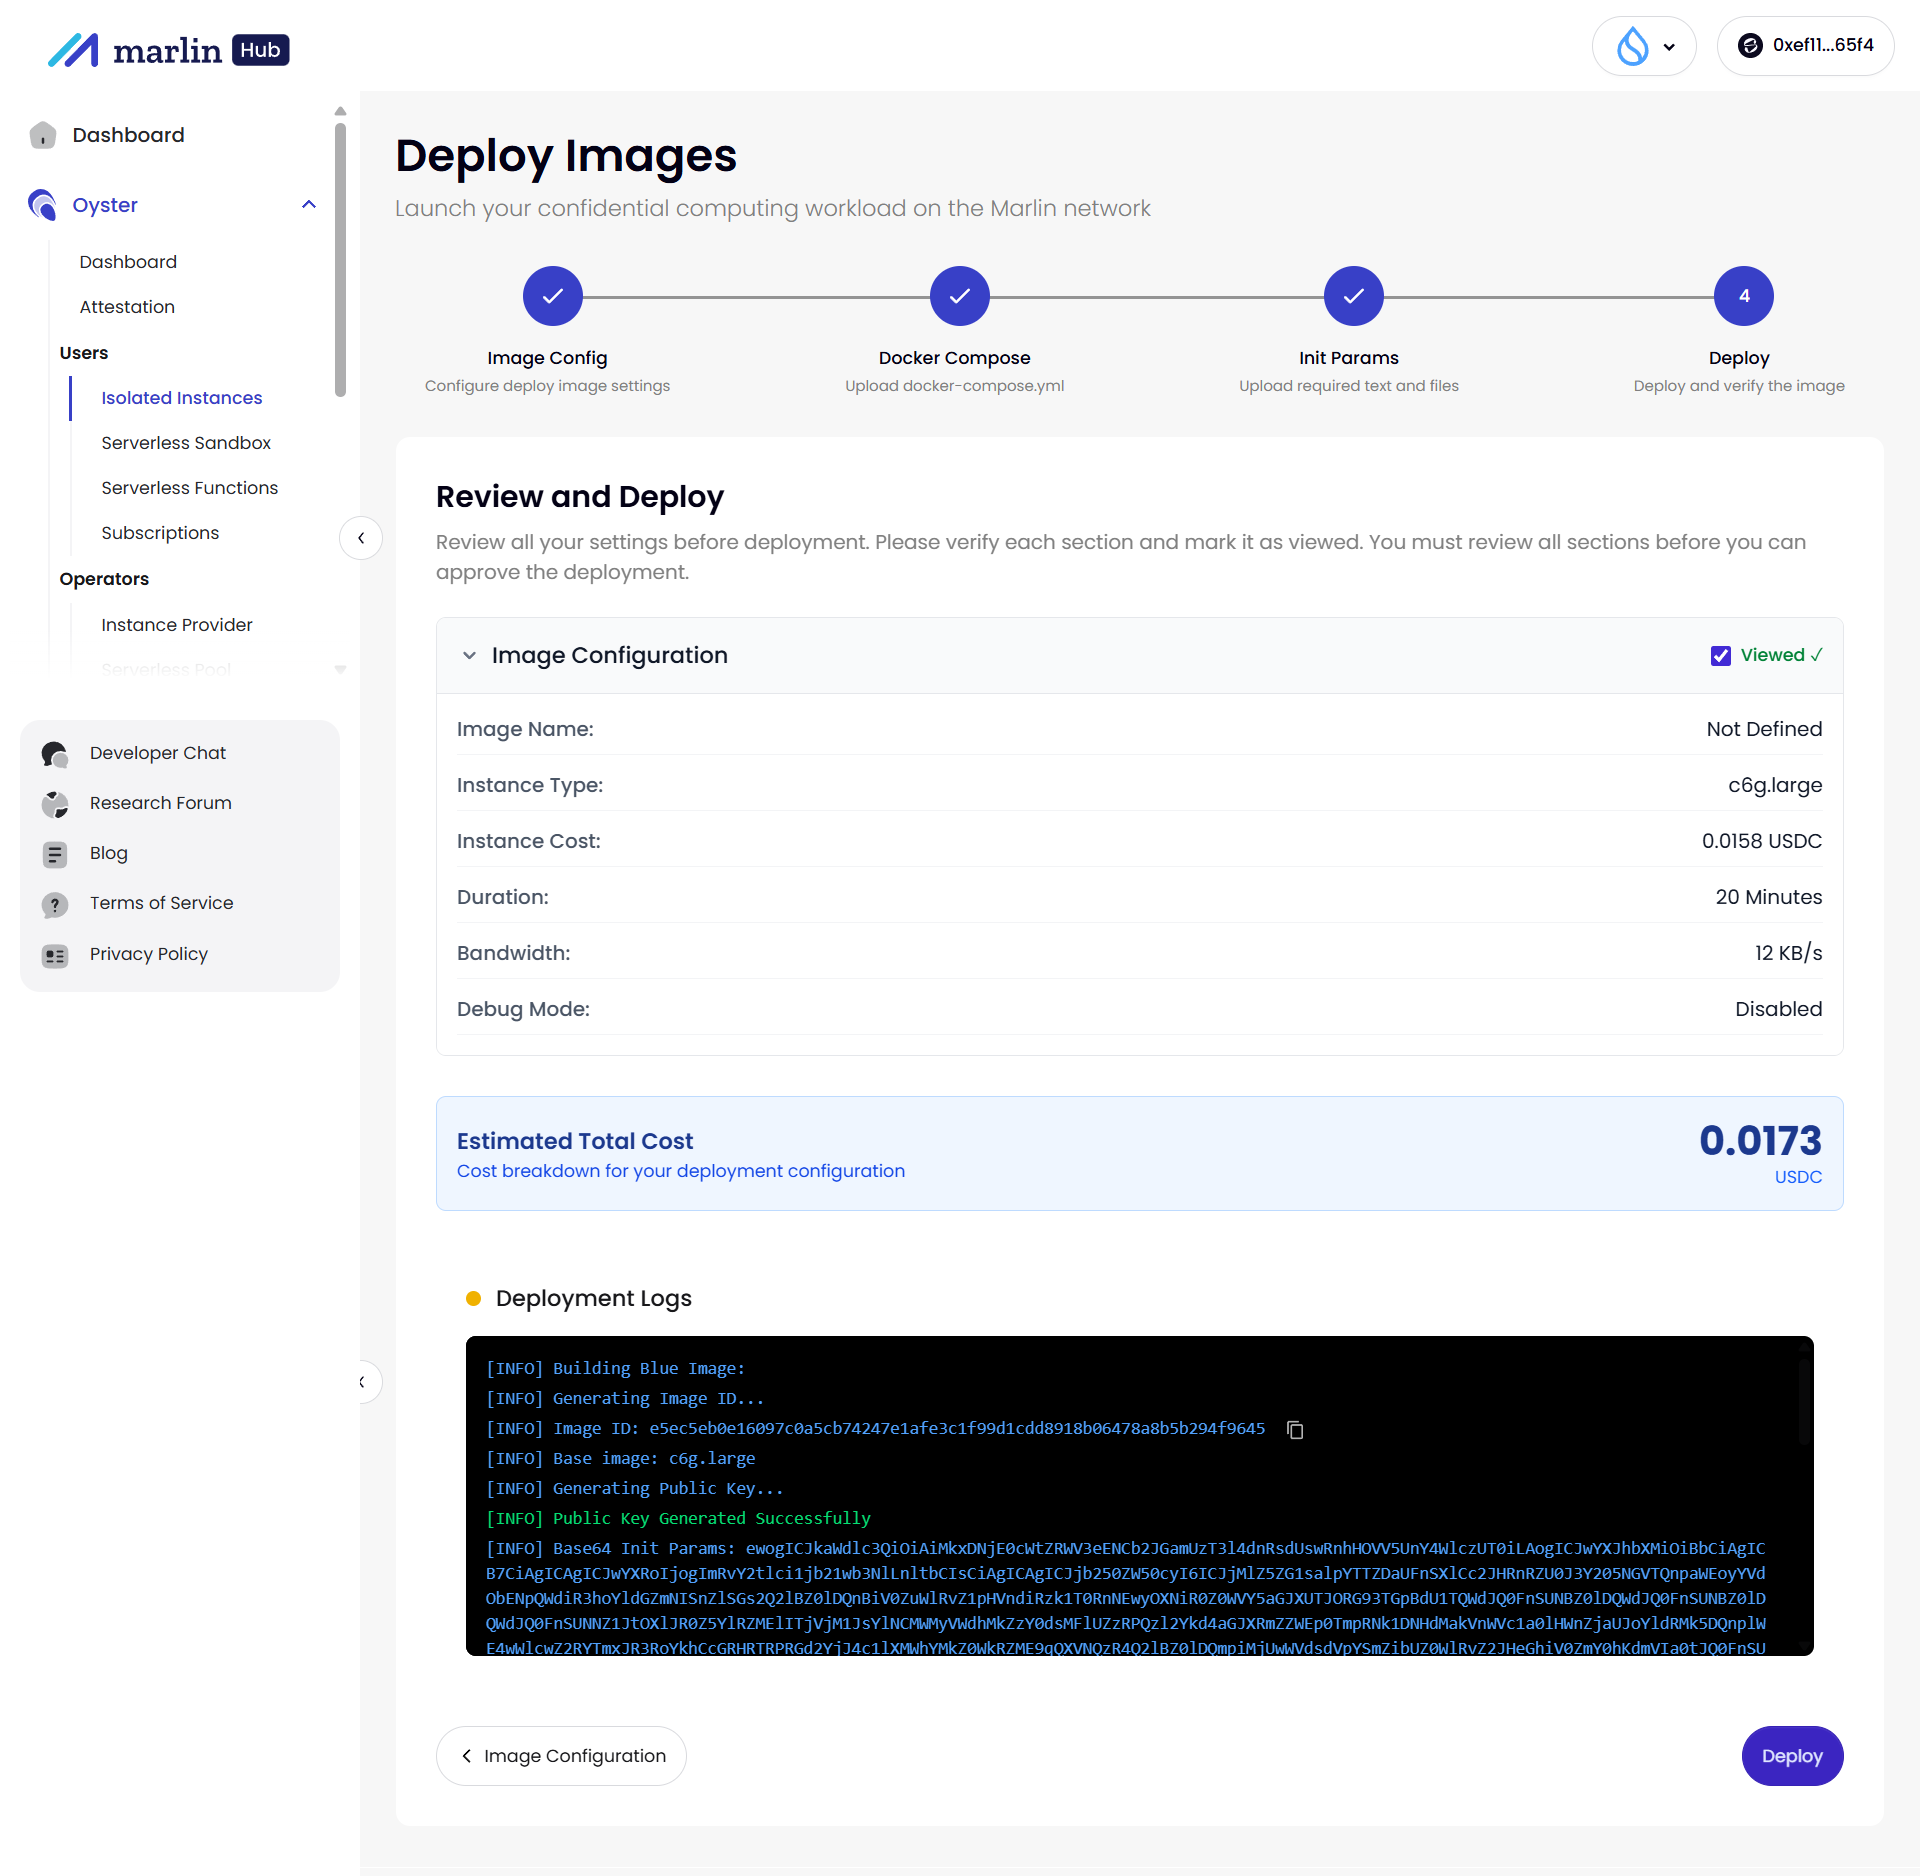
- Review, Image ID, and deploy
- The UI computes the Image ID, derives the public key, and shows the base64 init params.
- Deployment logs stream in real time; you copy the Image ID directly from the UI for attestation.
A practical way to think about it:
-
Use the UI when you’re exploring, iterating on configs, onboarding new team members, or doing one-off deployments.
-
Use the CLI when you’re wiring Oyster into CI/CD, managing infrastructure as code, or need fully scripted workflows.
Both paths speak the same language: Blue Images, init params, Image IDs, and attestations.
Integrated Docker Compose Management
The Docker Compose step now includes built-in templates for common use cases, real-time validation, and a code editor that makes it easy to customize configurations:
// Docker Compose templates provide starting points

export const DOCKER_COMPOSE_TEMPLATES = [

{

id: 'web-server',

title: 'Web Server',

description: 'Simple Nginx web server with static content',

content: `version: '3.8'

services:

web:

image: nginx:alpine

ports:

- "80:80"

volumes:

- ./html:/usr/share/nginx/html

restart: unless-stopped`

},

// ... more templates

];
The interface validates Docker Compose syntax in real-time, catching errors before deployment. Architecture-specific warnings ensure developers select compatible container images for their chosen platform (amd64 or arm64).
Automated Image ID Computation
Image ID computation now happens automatically during the deployment review step. The system handles all the complexity behind the scenes:
export async function computeImageId(args: ComputeImageIdArgs = {}): Promise<string> {

const { preset = 'blue', arch, debug = false, initParams = [], dockerCompose } = args;

// Step 1: Load PCR values for the Blue Image preset

const pcrs = loadPCRs(preset, arch, debug);

// Step 2: Process init parameters and compute PCR16

const initParamB64 = await loadInitParams({

initParams,

dockerCompose,

preset,

arch,

debug

});

// Step 3: Compute final Image ID from PCR0, PCR1, PCR2, and PCR16

const hasher = createHash('sha256');

const pcrFlags = (1 << 0) | (1 << 1) | (1 << 2) | (1 << 16);

hasher.update(flagsBuffer);

hasher.update(pcr0Bytes);

hasher.update(pcr1Bytes);

hasher.update(pcr2Bytes);

hasher.update(pcr16);

return hasher.digest().toString('hex');

}
Developers using the UI can now also have Image IDs computed automatically during the review step, with results displayed in the deployment logs for verification. CLI users continue to have full control over Image ID computation and can integrate it into their existing automation pipelines exactly as before.
Simplified Init Parameter Management
The init parameters step now supports both individual file uploads and bulk input, with a clear interface for managing attestation and encryption settings:
// Bulk input format for init parameters

// Format: <enclave_path>:<attest>:<encrypt>:<type>:<value>

const bulkInputExample = `

config/rpc_url:0:0:utf8:https://api.example.com

secrets/api_key:1:1:utf8:your-secret-key-here

data/config.json:0:0:file:./config.json

`;
The interface provides several ways to work with init parameters:
- Drag-and-drop file uploads: Simply drag files into the interface no need to navigate file dialogs
- Bulk input mode: Paste multiple parameters at once using the standardized format, perfect for migrating existing configurations
- Individual controls: Toggle attestation and encryption per parameter, giving you fine-grained control over what gets attested and what stays encrypted
- Visual feedback: Clear indicators show which files are uploaded and which need attention, preventing deployment with missing dependencies
Streamlined Deployment Flow
The entire deployment process is now a cohesive four-step flow:
- Image Configuration: Select instance type, region, architecture, and set deployment parameters
- Docker Compose: Upload or paste your Docker Compose file with real-time validation
- Init Params: Add files and text entries your application needs (optional)
- Deploy & Verify: Review configuration, deploy, and automatically verify attestation
Each step provides clear guidance and validation, with the system handling cryptographic operations automatically. The deployment logs show exactly what’s happening at each stage:
[INFO] Building Blue Image: my-app

[INFO] Generating Image ID...

[INFO] Image ID: a1b2c3d4e5f6...

[INFO] Base image: base-blue_v3.0.0_linux_amd64

[INFO] Generating Public Key...

[INFO] Public Key Generated Successfully

[INFO] Base64 Init Params: eyJkaWdlc3QiOi...

[INFO] ✓ Deployment complete!
Enhanced User Experience
Beyond the technical improvements, we’ve focused on making the interface more intuitive:
- Contextual Help: Each step includes explanations of what’s happening and why
- Error Prevention: Validation catches issues early, before they cause deployment failures
- Progress Visibility: Real-time logs show the deployment process step-by-step
- Flexible Workflows: Support for both simple deployments (with Docker Compose) and advanced deployments (with custom EIF URLs)
The advanced deployment mode allows experienced users to provide their own enclave image URLs while still benefiting from the streamlined init parameter management and Image ID verification.
Conclusion: Deploying with Confidence
Blue Images fundamentally changed how we think about enclave deployment by separating platform trust from workload flexibility. With our latest updates, we’ve made that power accessible to developers at every level.
The new deployment experience provides more options for interacting with Blue Images while preserving the flexibility and security guarantees that developers rely on. You can deploy a Blue Image enclave in minutes using either the UI or CLI, with both approaches handling Image ID computation, public key derivation, and init parameter encryption. The UI offers a guided, visual experience for exploration and iteration, while the CLI continues to excel at automation, scripting, and CI/CD integration.
But perhaps the most significant improvement is the reduction in cognitive load. Developers can focus on what matters: writing Docker Compose files, configuring services, and defining init parameters. They don’t need to understand the intricacies of PCR measurements or Image ID computation; the system handles the cryptographic complexity while providing full transparency through deployment logs.
This isn’t about hiding complexity; it’s about letting developers work at the right level of abstraction. When you need to verify an Image ID or understand what’s happening under the hood, the information is there in the logs or accessible via CLI. But for day-to-day deployments, you can focus on your application logic.
As we continue to evolve Blue Images, we’re committed to maintaining this balance: powerful enough for complex use cases, simple enough for rapid iteration. The latest deployment interface is a step toward making confidential computing as accessible as traditional cloud deployment, without compromising on the security guarantees that make TEEs valuable.
Whether you’re deploying a simple web server, a machine learning workload, or a complex multi-service application, the streamlined Blue Images deployment flow makes it easier than ever to leverage the power of trusted execution environments. With Blue Images, deploying on Oyster gets easier and with the latest update, it’s more streamlined than ever. Choose the UI for guided, visual workflows, or use the CLI for automation and scripting; both are first-class deployment methods that work with the same powerful Blue Image primitives.